

@GMShanky Bounces Back
@GMShanky Bounces Back
Sam Shankland wins the Ayelen Invitational, outright, scoring 4.5/6 after blitzing out to +4 in the first five rounds.

First things first, Check. is arriving in your inbox a few days later than usual this week. I’ve had quite the busy week trying to sort some things out professionally, and then I’ve also been busy working on my own chess. On Thursday evening I participated in a collaborative chess.com puzzle rush streamed on the twitch channel @chessfeels, (the VOD can be found here: https://www.twitch.tv/videos/808975694) and Saturday morning I played a rather serious training game that illuminated some rather serious deficiencies in my understanding of King’s Indian-type positions. It’s been hard to carve out time to sit down and write a column during a week when progress on my own chess has been so difficult. But learning is not easy. Nobody said it would be, and yet, we persist.
In that vein, we turn our attention to the chess efforts of Super-GM and American #6, Sam Shankland, who featured ignominiously in the second issue of Check. “Sam Shankland and the No Good, Very Bad, Saturday.” In that issue, we saw Sam, who maintains a classical rating of 2691, just nine points off of the incredible rating of 2700, and good enough to be ranked #44 in the world, faltering in Online Rapid Play, and costing the U.S. team vital half points in the FIDE Chess.com Online Olympiad.
It’s tempting to ascribe results (either good or bad), to “talent.” It is, of course, true that world champion Magnus Carlsen rarely blunders in such fashion. And it is often true that not every blunder is “instructive” in a chessic sense. Sometimes you blunder, and it’s pedantic and patronizing to remind the chess player that one should not blunder. Sometimes it feels hard to imagine how hard work could prevent or eliminate such mishaps. But it’s wrong-headed to imagine that talent (or lackthereof) is solely responsible for a player’s successes (and failures). Our society’s tendency to fetishize talent and minimize the sheer amount of work that goes into creating success is little more than a defense mechanism allowing most people to satisfy themselves with mediocrity.
Sam Shankland is not most people. Hardly two months after I wrote the aforementioned column, we got this tweet from @GMShanky:


And there you have it. Sam Shankland doesn’t owe anybody anything. He has nothing to prove to the chess world. He could easily say he wasn’t feeling well. He could easily say that online rapid-play isn’t real chess and point to his success in classical time controls, over-the-board. But that’s not the attitude that got him where he is today. The attitude that earned Sam his accolades is rooted in the understanding that hard work pays off. And it’s an attitude rooted in the understanding that there is no failing that can’t be corrected with enough hard work.
In the Ayelen Invitational (an event played on chess24.com at the brisk time control of 10 minutes a side, plus 5 seconds per move) Shankland faced world #14 Leinier Dominguez Perez, world #60 and former world championship challenger Boris Gelfand, world #59, the legendary Vasily Ivanchuk, as well as talented Grandmasters Eduardo Itturizaga, Alan Pichot, and S.P. Sethuraman. And he’s right, winning by a full point against such a field, while playing with the black pieces 4 times in six games is no small feat. Let’s see how all that recent hard work paid off:
Game of the Week #11
Leinier Dominguez Perez vs. Sam Shankland (0-1) Round 4 of the 2020 Ayelen Invitational
e4 c5 2. Nf3 d6 3. d4 cxd4 4. Nxd4 Nf6 5. Nc3 Nc6 6. Bg5 e6 7. Qd2 a6 8. 0-0-0 Bd7 9. f3 Nxd4!? (diagram)
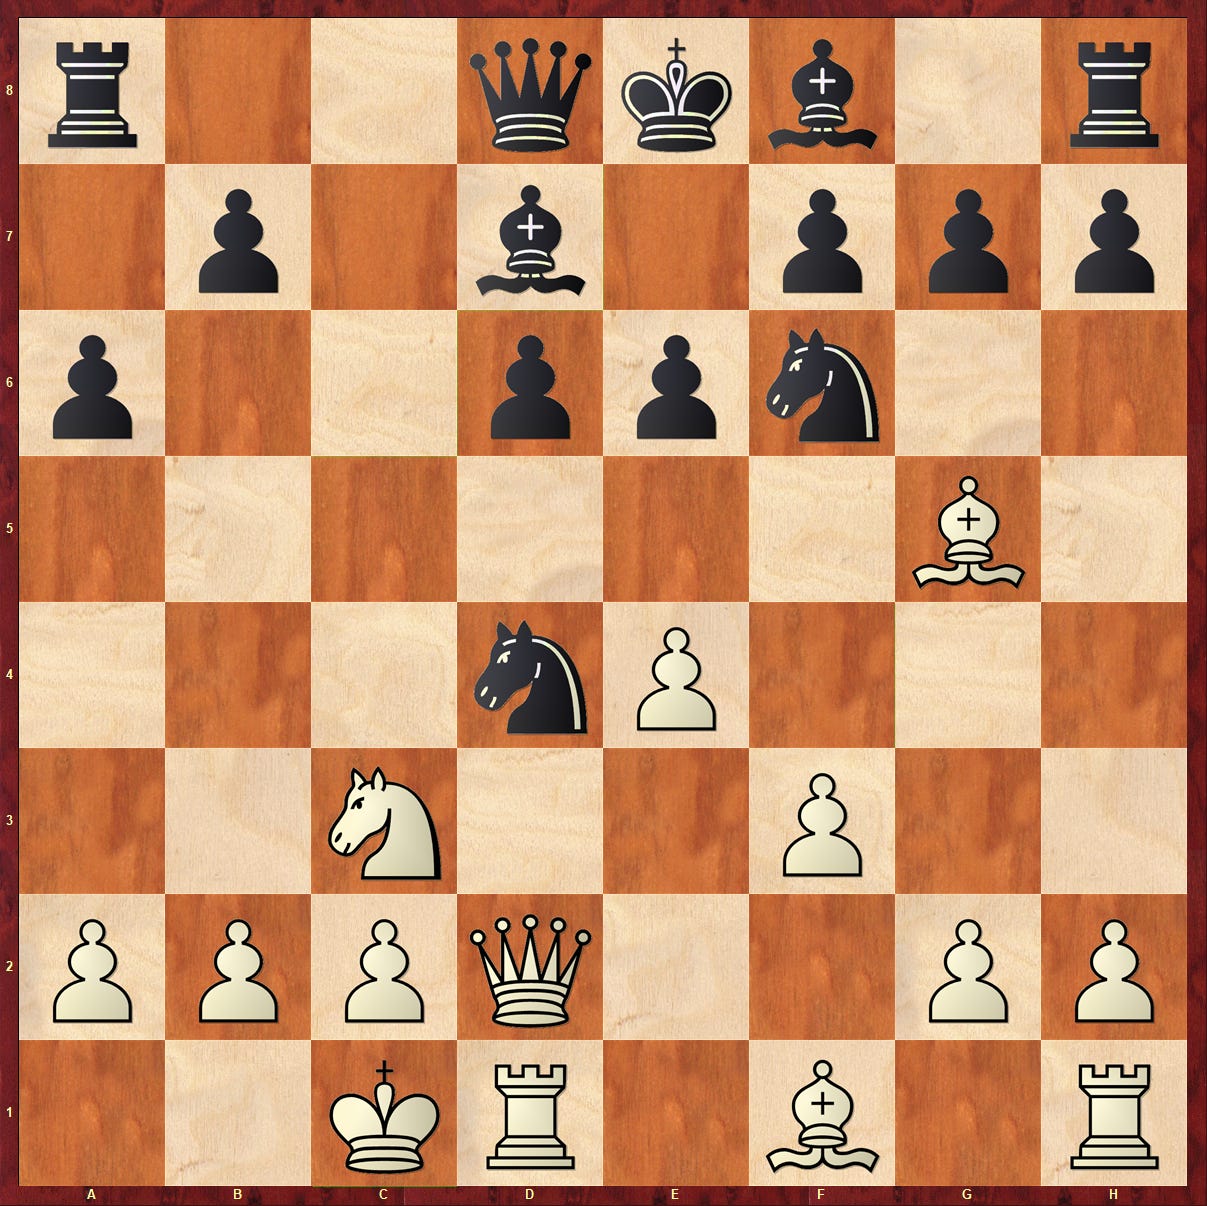
This move is not yet a novelty, strictly speaking, but it is an interesting idea that’s clearly been part of Shankland’s opening preparation. Without going into too much detail about what’s going on here (ok sorry, I’m going into too much detail), I believe I can elucidate the idea behind this early exchange.
In these classical Sicilian positions where white castles queenside and plays 9. f3!?, the obvious idea for the player with the white pieces is to expand on the kingside with g2-g4, h2-h4-h5, and checkmate the black king. For his part, the black king may find shelter on the kingside, or may remain in the center. In either case, the defense of the black king’s castled (or un-castled) position is often aided by the queen’s knight, which attempts to establish a stronghold on the e5 square (See Yip - Krush from this column a few weeks ago). If black develops “normally,” for example, by playing 9. … Be7, we might see:
h4 h6 (earning a tempo against the g5 bishop) 11. Be3 h5 (preventing g4, but allowing the bishop to return to the g5 square) 12. Bg5 Ne5! 13. f4 Neg4! when white is not making further progress on the kingside, and black is free to begin counterplay along the half-open c-file with b7-b5-b4, Rc8, and Qc7.
For this reason, white players have started playing the position with a little more subtlety:
Be3!? h5 (there’s no g5 bishop to push anymore, so we get straight to the point) 11. Kb1 b5 12. Nxc6!? Bxc6 13. Ne2 (diagram)
The white player’s idea is simply that the c6 knight is often an important defensive piece, if it’s allowed to find a permanent home on e5 or g4. The white d4 knight is an attractive attacking piece, but the c3 knight is a bit of a nuisance. It’s often annoyed by black’s b5-b4 push, and it really wants to be on the square d4 or d5, but finds those squares either occupied or inaccessible. So white first exchanges the knights on c6, forcing black to misplace his bishop, and then re-routes the c3 knight to d4 where it will gain a tempo on the black light squared bishop, before beginning his kingside play. For his part, black is deprived of key defensive ideas like … Ne5, and the tempo-gaining move b5-b4.
Shankland exchanges the c6 knight on his own terms, forcing white to misplace the queen on d4:
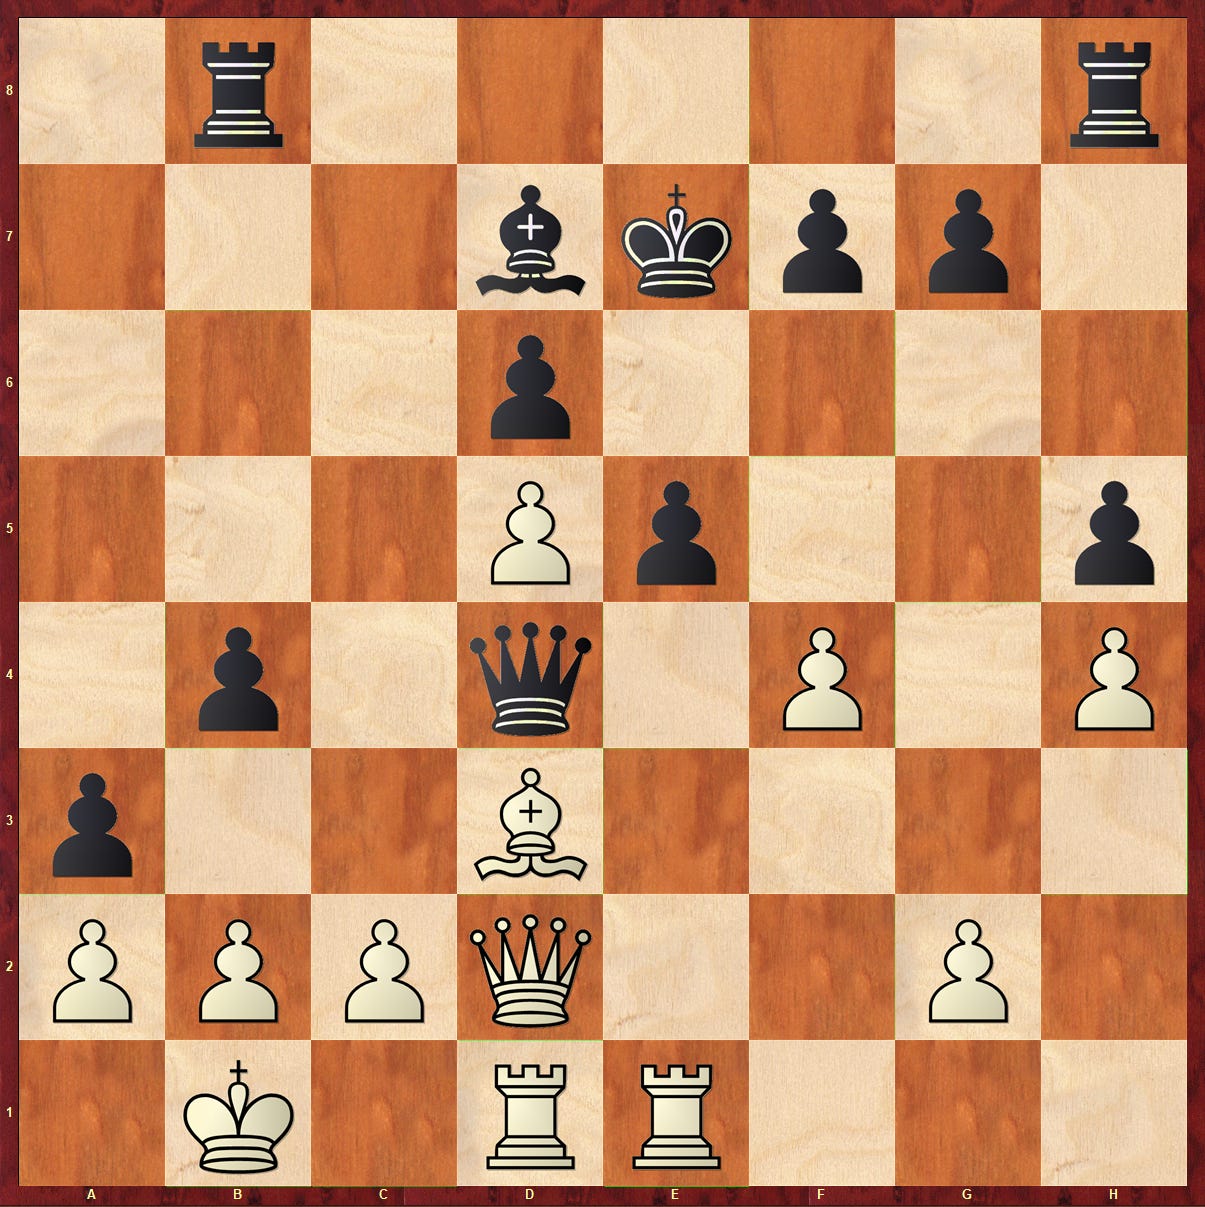
… Nxd4!? 10. Qxd4 Be7 11. Be3?! (diagram)
Of course I’ve attached a “?!” to this move, but it’s not really dubious in itself. The issue that I see over the next several moves is that I see Leinier Dominguez Perez being outplayed because he hasn’t done as much work as Shankland has to understand this position, and he doesn’t understand what’s different after 9. … Nxd4!?, so he just plays the plan that he would’ve played anyway, and finds that black’s idea is sound, and his position is completely comfortable. It would have been better to press on with the original idea of 11. h4!? h6 12. Be3 h5 13. Bg5 b5 14. Kb1, when the white queen is, indeed, misplaced on d4, but this concession has at least cost black his queen’s knight, which is never coming to its proper defensive post on e5 or g4. By playing with 11. Be3, 12. Kb1, and 13. h4, Dominguez Perez seems to be following moves he’d prepared for the line where he’s able to exchange knights on c6 and bring the c3 knight around. With the queen in the way, here, and no tempo to gain against the light squared bishop, white doesn’t have the luxury or the time.
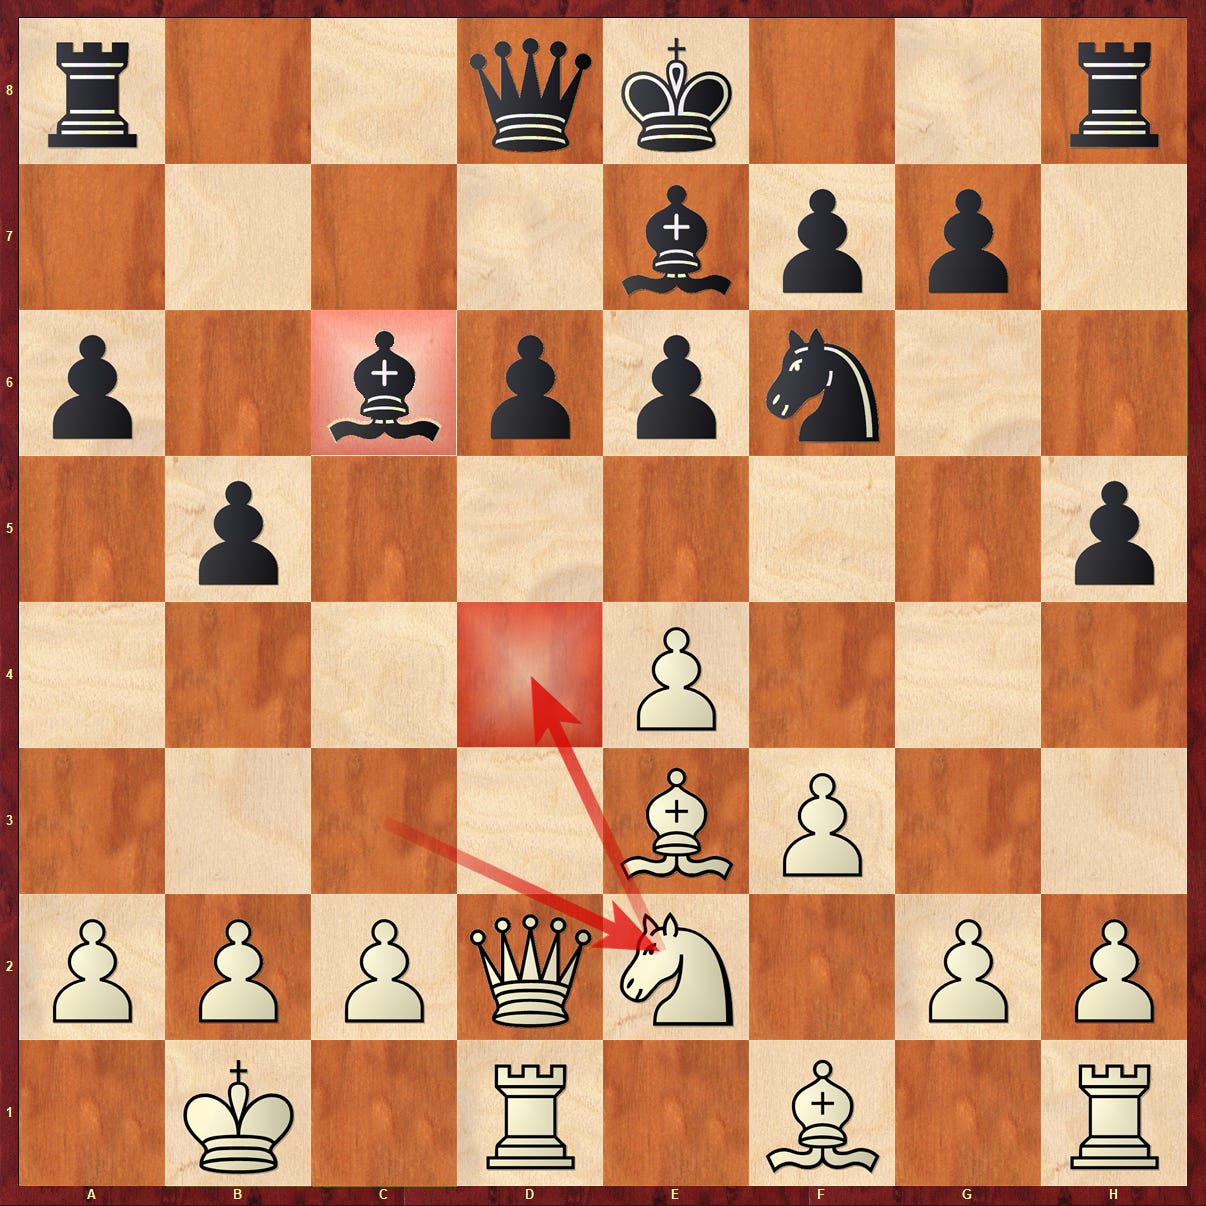
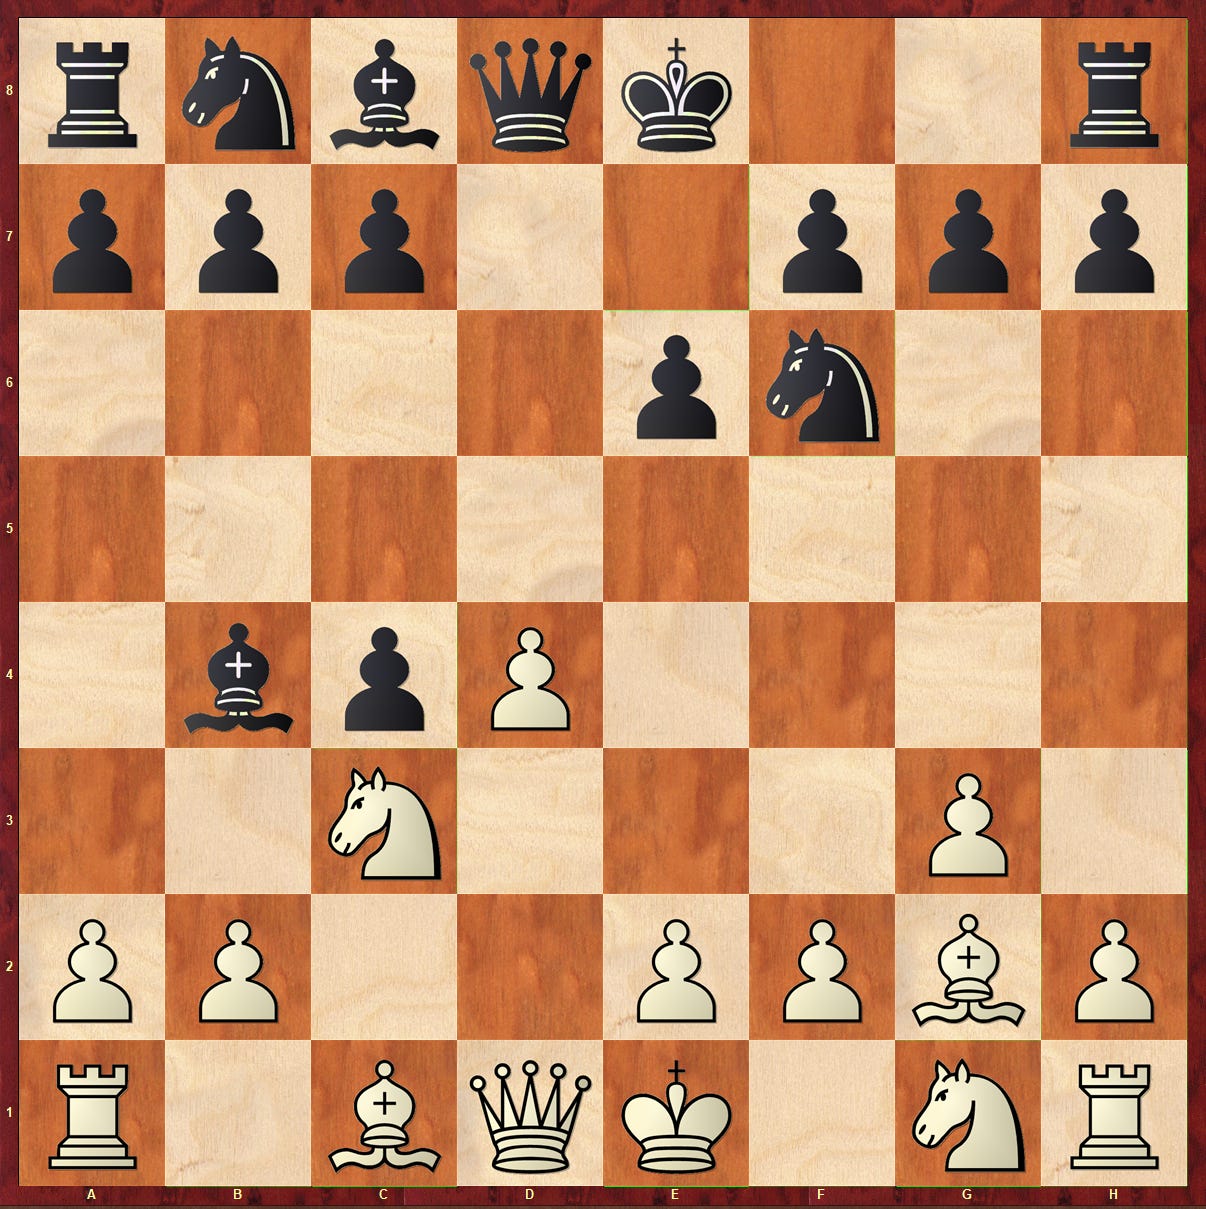
… h5 12. Kb1 b5 13. h4 Qc7 14. Qd2 (getting out of the way but - black’s counterplay is already landing) b4!? 15. Ne2 a5 16. Bg5 a4! (diagram)
When people say that Sicilian middlegames are sharp and require a great deal of preparation and understanding, this is what they mean. When the position is a race between a pawn storm on the kingside and a pawn storm on the queenside, a tempo here or there changes the entire character of the position. Black’s a4 and b4 pawns are already making contact with the white king’s cover, and white has made absolutely no progress on the kingside, despite that he’s played all of the “normal moves.” Dominguez Perez must have been scratching his head trying to figure out where he went wrong. Technically, I believe the move 16.Bg5?! is actually the move that ruins white’s position, but I believe that if Perez knew that Bg5 was bad here, he never would have gone for 11. Be3, and would have simply soldiered on with 11. h4.
Incidentally, the move 16. … a4 can be played confidently because the b4 pawn is completely irrelevant, material wise. Black is trying to open lines on the queenside and give mate. 17. Qxb4 Rb8 only helps the cause. This is an interesting example of a position that illustrates the difference between “human” and “computer” understanding of chess. Only the very strongest engines at depths of 25 or 30 understand that you should not take the b4 pawn. Komodo 10 still likes white to grab it at a depth of 22, and at depth 26 it realizes that black has full compensation, but it still grabs it. Humans are never taking that pawn, and neither are Stockfish or Leela.
Here, Dominguez Perez was in for his first “long” think of the game. He played 16. Bg5 after 8 seconds. He spent two full minutes (you’re only given 10) on move 17, and he completely abandoned the plan with Nd4, g4, etc.:
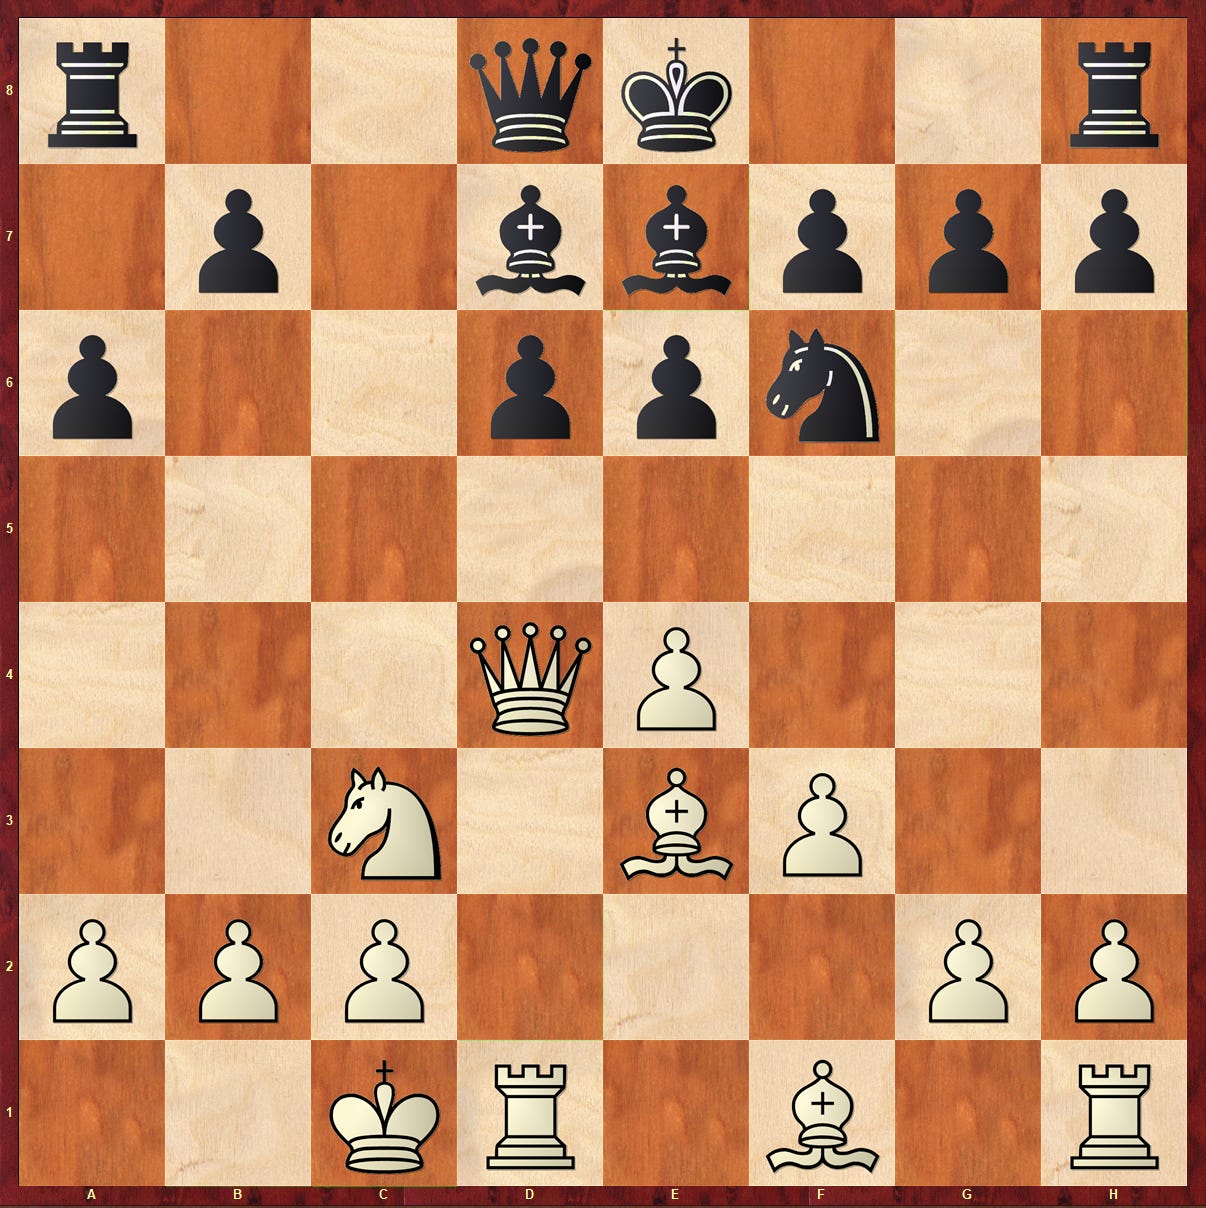
Nf4!? Rc8 18. Ba6 Rb8 19. Bd3 Qc5 20. Rhe1 e5!? 21. Nd5 Nxd5 22. exd5 a3 (land-ho!) 23. Bxe7 Kxe7 24. f4 Qd4 (diagram)
With 16. … a4, the queenside initiative firmly passed to black, and white begins counterplay in the center of the board, in a true role-reversal for Sicilian middlegame positions. 17. … Rc8 is probably an inaccuracy, because it allows white to gain a tempo on the rook while evacuating his bishop from the first rank, as in the game. Unfortunately, Dominguez Perez handed the tempo back immediately with 19. Bd3, instead of the precise 19. Rhe1 which is more “to the point” of fighting for control of the central files. The bishop can retreat all the way to f1 later, once the h rook has entered the game.
In the diagram position, we see that Shankland has used all the tempi white gifted in order to organize a solid defensive construction in the center of the board. Even after the thematic break 24. f4! the black king is feeling little heat:
Mate is threatened on b2, and Dominguez Perez had under two minutes on his clock:
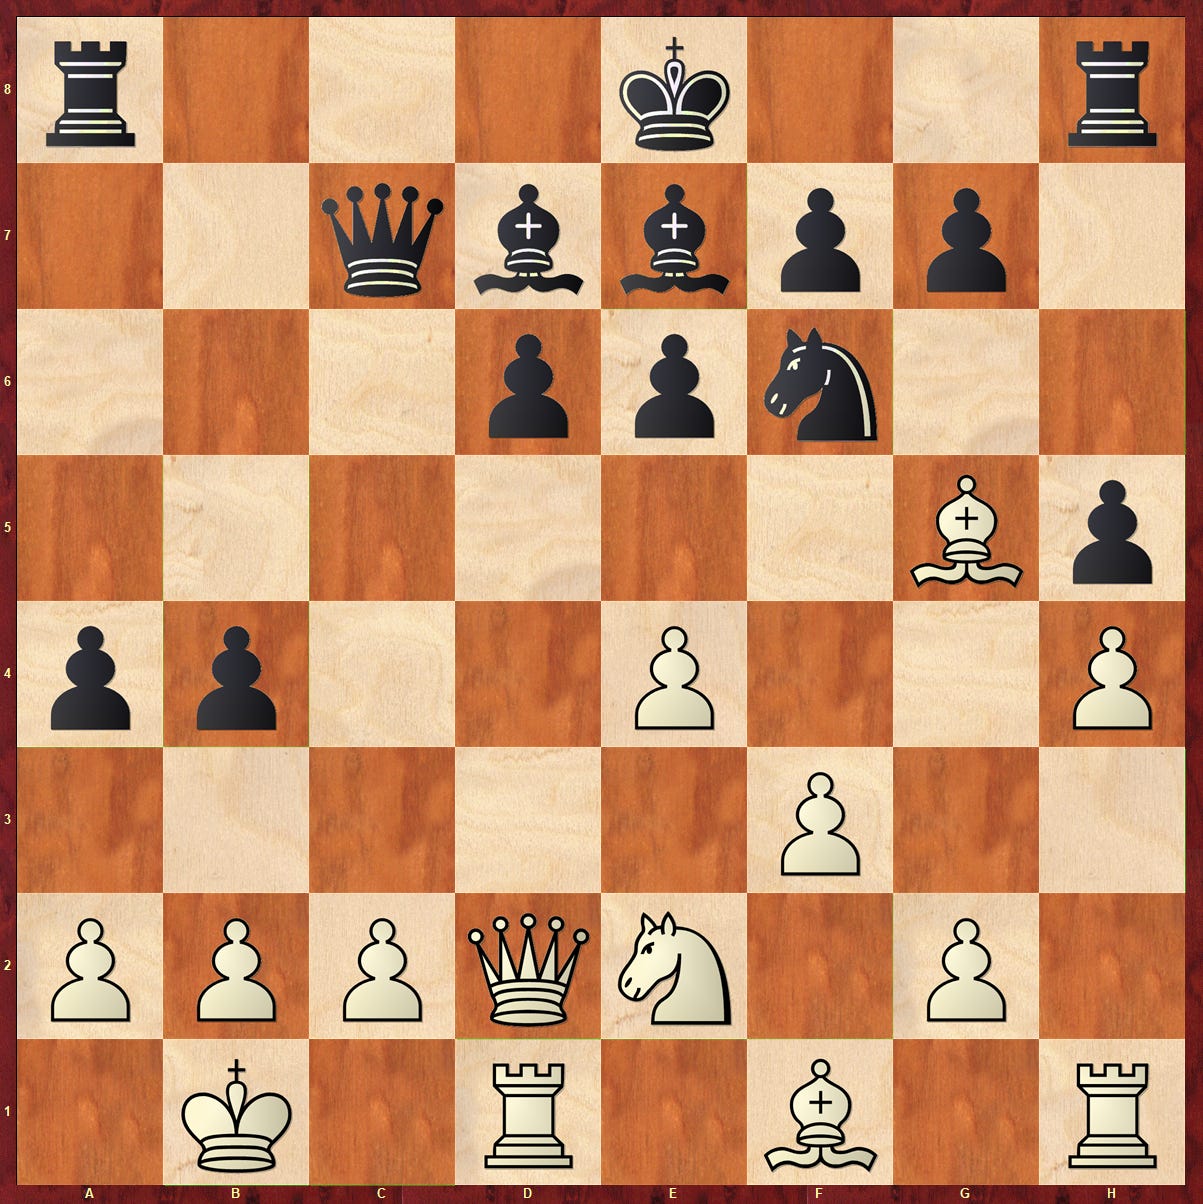
Qc1 Bg4 26. Be2 axb2 27. Qd2 (27. Qxb2? Qxf4 is a terrible mistake which leaves every single white pawn loose) Qxd2 28. Rxd2 Bxe2 29. Rexe2 f6 30. Kxb2 Rhc8 (diagram)
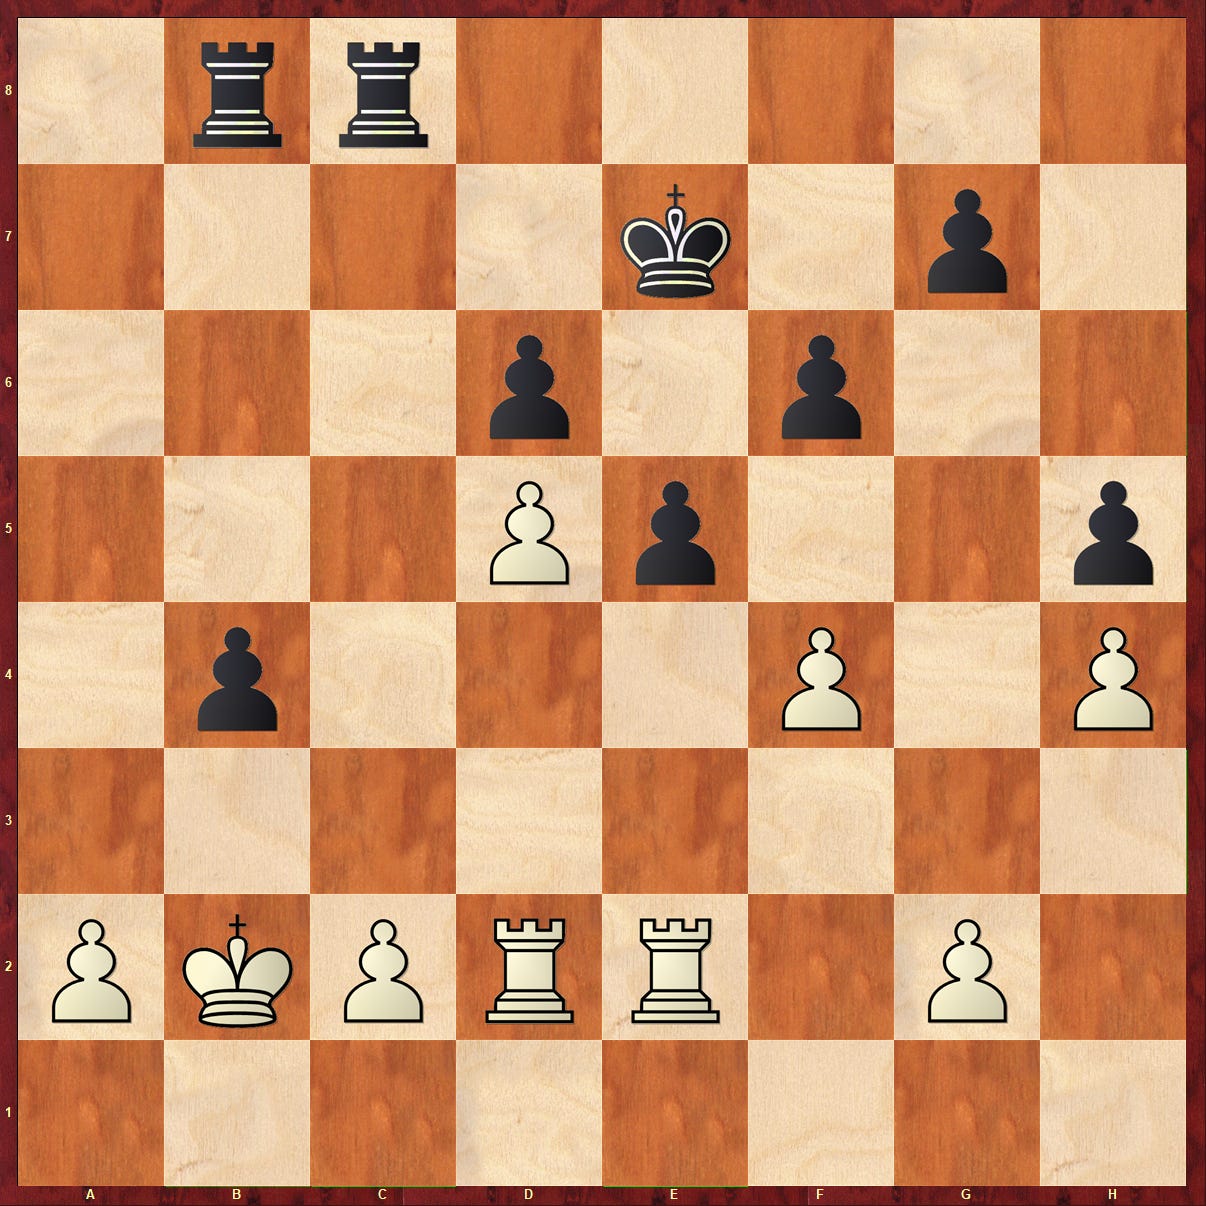
As it stands, most of white’s pawns are still weak. This is a dream rook endgame for the player with the black pieces. The white pawns on a2, c2, d5, are all targets in different lines. There is a lot of subtlety and precision required to defend such positions, and Dominguez was playing on increment, having used his entire time allotment to solve the opening problems.
Re4 Rc3? (diagram)
Here, for example, Shankland errs, and allows white a thematic opportunity to exchange off a weak pawn in his camp and create a weakness in black’s structure. This is an excellent, instructive move, missed by Dominguez Perez, who had no time. White to play and save this rook ending:

The answer is 32. g4!, when after 32. … hxg4 33. fxe5 dxe5 34. Rxg4 Kf7 35. Rdg2 (for example), the black g7 pawn comes under fire, and white has achieved equality. Incidentally, 33. … g3!? 34. exf6 is no better, as the isolated black f pawn becomes an issue, instead. But Dominguez Perez missed his chance at a tactical rescue, and he played on:
fxe5 dxe5 33. Rxb4?? (diagram)
Black to play and win:

This is really an elementary oversight, at the end of the day, but even for a player of the caliber of Dominguez Perez, such moves can be easy to miss with no time to calculate and double check. The idea of Rxb4 is that the c3 rook’s defender is removed, and 33. … Rxb4? can be met by 34. Kxc3, when white has solved the problems. Dominguez Perez must have missed that black can insert a typical “zwischenzug” or “in between move,” for you English speaking readers. Shankland did not miss it:
… Rxc2+! 34. Rxc2 Rxb4! 35. Ka3 Rxh4 (diagram)

Here, black is a pawn up. But white would probably be holding if his three pawns were connected, while black’s four were strewn about the board. Instead, white’s structure is decimated. All three remaining pawns are weak and going nowhere, while black has already created one passed pawn on e5, and will likely be able to exchange the h-pawn for the g2 pawn, creating three connected passers. This is all too much to defend against, and white is lost. I’ve included the rest of the moves only so that you can play them out at home if you’re unclear on how black goes about actually technically winning such a position, and also to show how easy it can be to accidentally draw it:
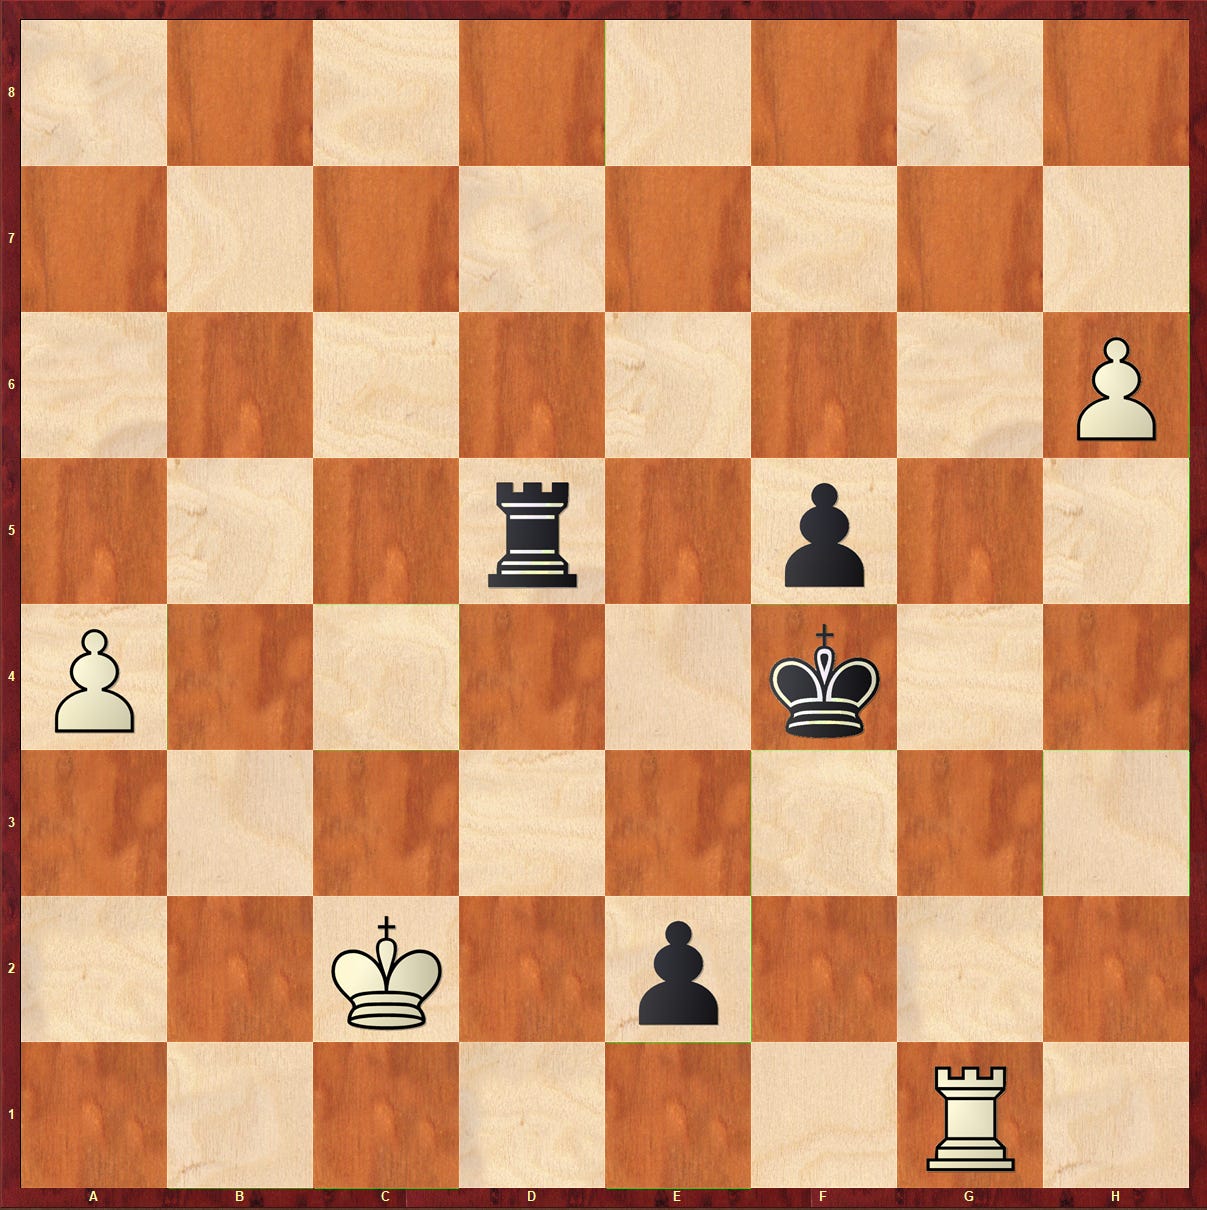
Kb3 Rd4 (incidentally, this move shows the strength of black’s advantage, there’s no reason to allow the capture of the g7 pawn that follows. Black can simply try 36. … Kd6 first) 37. Rc7+ Kd6 38. Rxg7 Rxd5 39. a4 e4 40. Kc2 Ke5 41. g3 h4!? (creating those connected passers, even at the cost of a pawn) 42. gxh4 Kf4 43. Rg1 f5 44. h5 e3 45. h6 e2? (diagram)
… e2 is a mistake. White to play and draw:
h7 is not difficult to spot, but the consequences of the sequence 46. … Rd8 47. Rg8! e1=Q were lost on these players with mere seconds to calculate. White draws after 48. Rxd8 because despite that black has a queen for a rook, he can never stop the h7 pawn and must settle for a perpetual check.
Black should play, instead, 45. … Rd2+ when 46. Kc3 loses to 46. … Rd7! because when white tries a similar maneuver to the aforementioned line (Rg7, h7, Rg8, etc.), the e-pawn promotes with check. 46. Kb3 instead and the king is too far away from the e-pawn, so black can win more simply with 46. … Rh2, after which he can promote the e-pawn and simply sacrifice the rook for the h7 pawn when it promotes. In the tactical skirmish that followed in the actual game, both players missed chances:
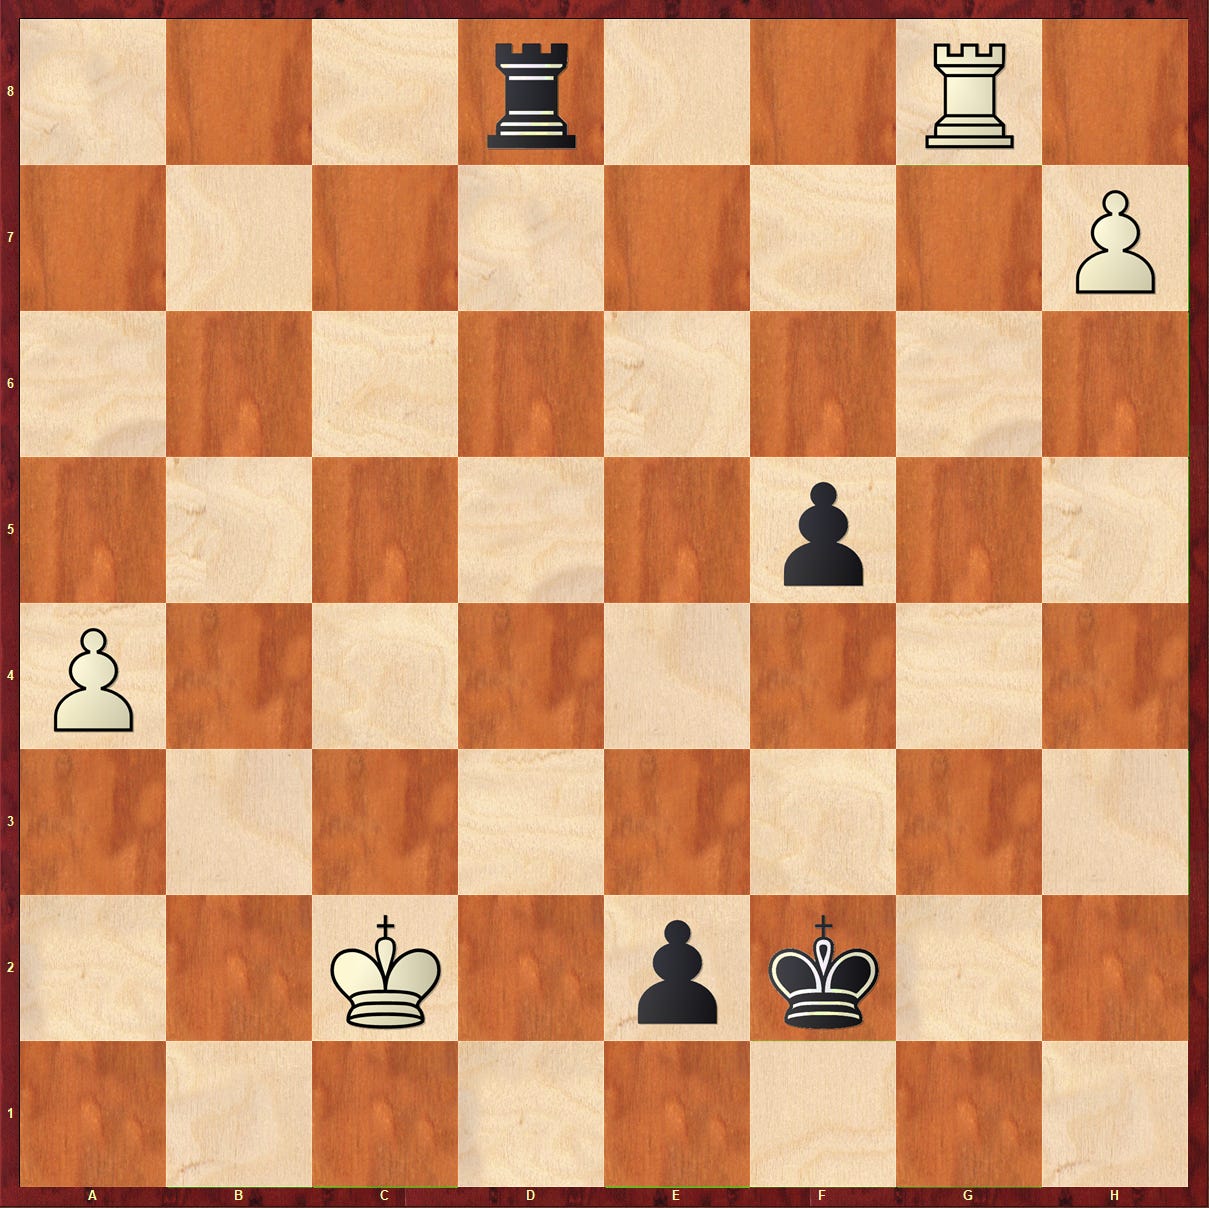
h7 Rd8 47. Rh1? Kg3! 48. Rg1+ Kf2 49. Rg8 (now the right idea, but with the King on f2, black has a fantastic resource - diagram)
Black to play and win:
… Rd2!! wins, after 50. Kxd2 e1=Q+ (promotes with check), when black can pick up the h7 pawn after a series of checks… 51. Kd3 Qe4+ 52. Kc3 Qc6+ 53. Kd4 Qd6+ 54. Kc4 Qc7+ and 55. … Qxh7.
Instead, 49. … e1=Q? should have drawn but Dominguez Perez blundered after a long, grueling defense:
Rxd8 Qe4+ 51. Kc3 Qe5+ 52. Kc2?? Qc7+ 53. Kd2 Qxd8 and white resigned. 0-1. 52. Kb3, and black cannot force the win of either the d8 rook or the h7 pawn with checks… but such things are impossible to play on instinct. Rather you need time on your clock to calculate, precisely.
Well played, Sam Shankland. And what better example of hard work and good understanding. It’s not every day that the #14 player in the world is made to look like he doesn’t understand the white side of the open Sicilian. But confident play and good understanding out of the opening netted @GMShanky a solid advantage and a comfortable time edge. He parlayed that into calm nerves and slightly better endgame accuracy. It wasn’t perfect, but it was enough to take down Leinier Dominguez Perez, so, well met.
Puzzle of the Week #13:
But first, a solution to last week’s puzzle:
In the given position, Korchnoi played 1. Rxh6+!! when black can choose between 1. … Kxh6 2. Qh8+ Kg6(5) 3. Qh5+ Kf6 4. g5+ and 5. Qxf3 or 1. … gxh6 2. Qg8+ Kf6 3. Qf8+ and 4. Qxf3. or 1. … Kf7 2. Qc7+ Kg8 3. Qc8+ Qf8 4. Rh8+! Kxh8 5. Qxf8 or 3. … Kf7 4. Qe6+ 5. Kf8 Rh8# or … well, you get the point.
In this week’s puzzle, which is nowhere near as difficult, black has made a typical opening mistake. White to play and win:
Simple enough, but it could happen in your games! Or worse, you could let it happen to you.
If you have solutions, questions, comments, or concerns, feel free to email at JensenUVA@gmail.com or DM on twitter: @JensenUVA
If you enjoy this newsletter, please like, share, subscribe, be about it, tweet about it, and all that stuff. It’s always nice to get feedback and engagement from the community. This week is Thanksgiving, but because today marks the opening round of the Skilling Open, which is the first event on the $1.5M “Champions Chess Tour” organized by the World Champion’s “Play Magnus Group,” you better believe we’ll be covering it. It’s likely that these columns for the next several weeks will cover positions and games from this event.
Until next time, ARGH! SHAKHMATY!!!