

The Queen's Gambit Inspires
The Queen's Gambit Inspires
The Netflix series reached #1 globally, and resulted in a surge of new interest in the game of chess.

No spoilers here. The Queen’s Gambit is a modern masterpiece. The miniseries, which is unquestionably the greatest portrayal of the game of chess that has ever graced the silver screen, enthralls from start to finish and offers a cathartic conclusion that follows logically from the heroine’s character development arc. There is no deus ex-machina to unnaturally resolve all of the human conflict, there are no logical leaps, and there is no heavy handed utopian (or dystopian) allegory. It’s merely a deep, dramatic, and difficult human struggle, with a typically human, and incomplete, resolution. And yet, it’s a series that stands fully on its own, and does not cry out for a sequel, or a second season.
Incidentally, the costuming is striking and superb. Gabrielle Binder would be a stone cold lock for the Emmy for Outstanding Costume Design had the show not been released so early in the 2021 nominating season. Eagle-eyed viewers and chess fans did note, however, that Magnus Carlsen had already worn one of Beth Harmon’s outfits.

BUT WHO WORE IT BETTER?
The series is surely a rare thing. And Queen’s Gambit viewers have found in the game of chess the ability to craft their own, personal sequel to Beth Harmon’s exploits, as interest in the game of chess has simply exploded. Google’s formidable trend spotting AI has been able to divine a correlation between the show and general interest in the game of chess:
And popular chess websites, chess publishers and merchandise retailers, as well as chess streamers and YouTube stars have all noticed a surge of interest. Agadmator’s popular chess YouTube channel has experienced a sharp increase in viewership, and an even more significant increase in female viewers, who see something of themselves, perhaps, in the show’s heroine:

For those new to the game, or those newly returning to the game, the depth and breadth of the accumulated chess knowledge is astounding. Serious study of the game is a lifetime pursuit, an obsession, and for some an addiction. For many, the quest is simply to be good enough to “understand” the games they see masters play. For many, the quest is to prove their strategic superiority in competition. But for all - the enduring question is: how to begin?
Where to look? What to study? If you asked a room of chess players, you’d get a variety of answers. “Tactics, tactics, tactics.” is a popular one. “Endgames” are more important than opening theory, says the conventional wisdom. “Strategy and positional concepts” seem to dominate the annotations and analysis of grandmaster games, and certainly seem the most mysterious and abstract to novice level players.
Humbly, your author can tell you that he does not have all the answers. But the thing that I wish I had understood much earlier is this: One thing that all chess prodigies, masters, and talents seem to have in common is an extraordinary appetite and capacity for the study of past grandmaster games. It follows logically that enjoying “the classics” leads to studying them, and studying them leads to understanding them. It is by understanding the brilliancies and the mistakes of those who have gone before us that we begin to understand the foundations of chess strategy, opening theory, endgame knowledge, and even tactics. The novel patterns that the old masters taught us appear again and again in our own games.
With that in mind - I’ve decided to dedicate this column to an old game that every chess player should know by heart. Intermediate and advanced players generally do, because the game itself is frequently used as a beginner lesson/lecture. It appears on screen in the first 15 minutes of “Critical Thinking,” when Mr. Martinez (John Leguizamo) is teaching a chess class. And it’s one of the more aesthetically pleasing games ever played.
For those of you just starting in chess, or returning to it, this is a great game to reinforce lessons about basic opening principles like development. If you’re teaching somebody else who’s new to the game, feel free to show them this game or the more modern opening disaster Nakamura - van Wely (2010), which I’ve included below it.
For more advanced players - scroll down to Nakamura - van Wely from 2010 for a modern example of an opening disaster along the open d-file, and next week I promise we’ll be back to more complex, topical fare:
Chess Class #4:
The Opera House Game. Paul Morphy vs. Duke Brunswick and Count Isouard (consultants) 1-0
e4 e5 2. Nf3 d6 3. d4 Bg4?! (diagram)
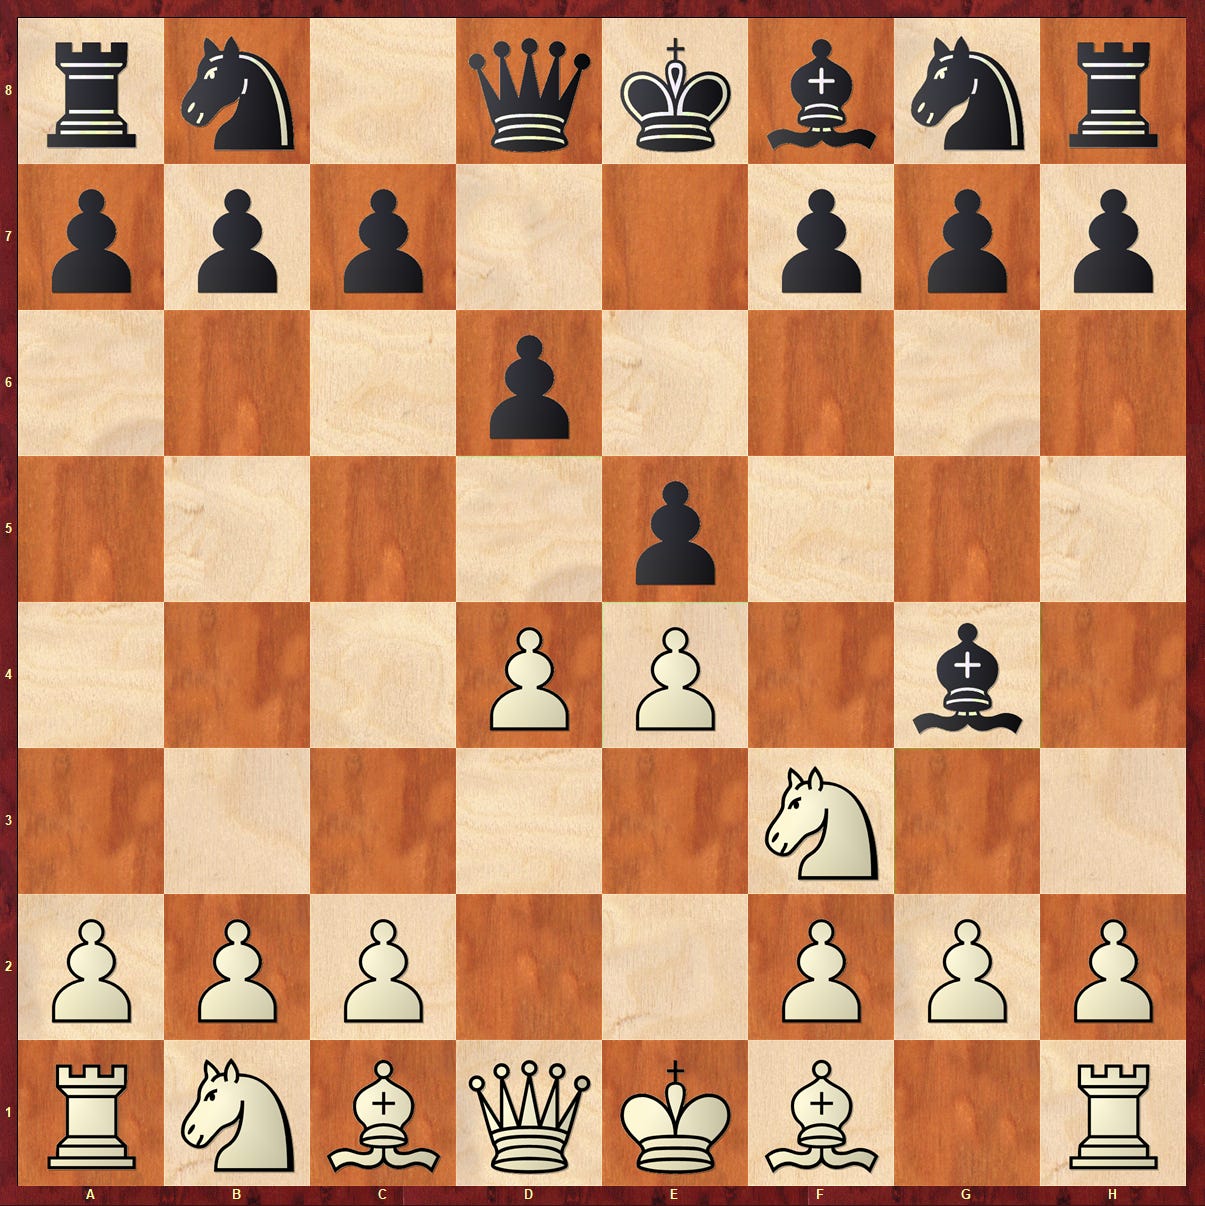
The idea to pin the f3 knight in order to defend the e5 pawn indirectly was one of the old ideas behind Philidor’s defense (2. … d6), and was fashionable at the time. It should come as little surprise that Morphy never played this move, himself. The problem is that white threatens already 4. dxe5 dxe5 5. Qxd8! (breaking the pin) Kxd8 6. Nxe5. As a result, black must insert the capture 4. … Bxf3, and while a bishop for a knight is an even trade from a material standpoint, black trades away his only developed piece, and brings the white queen out to f3, where it exerts influence on the weak square f7. This all came very naturally to Morphy:
dxe5 Bxf3 5. Qxf3 dxe5 6. Bc4! (diagram)
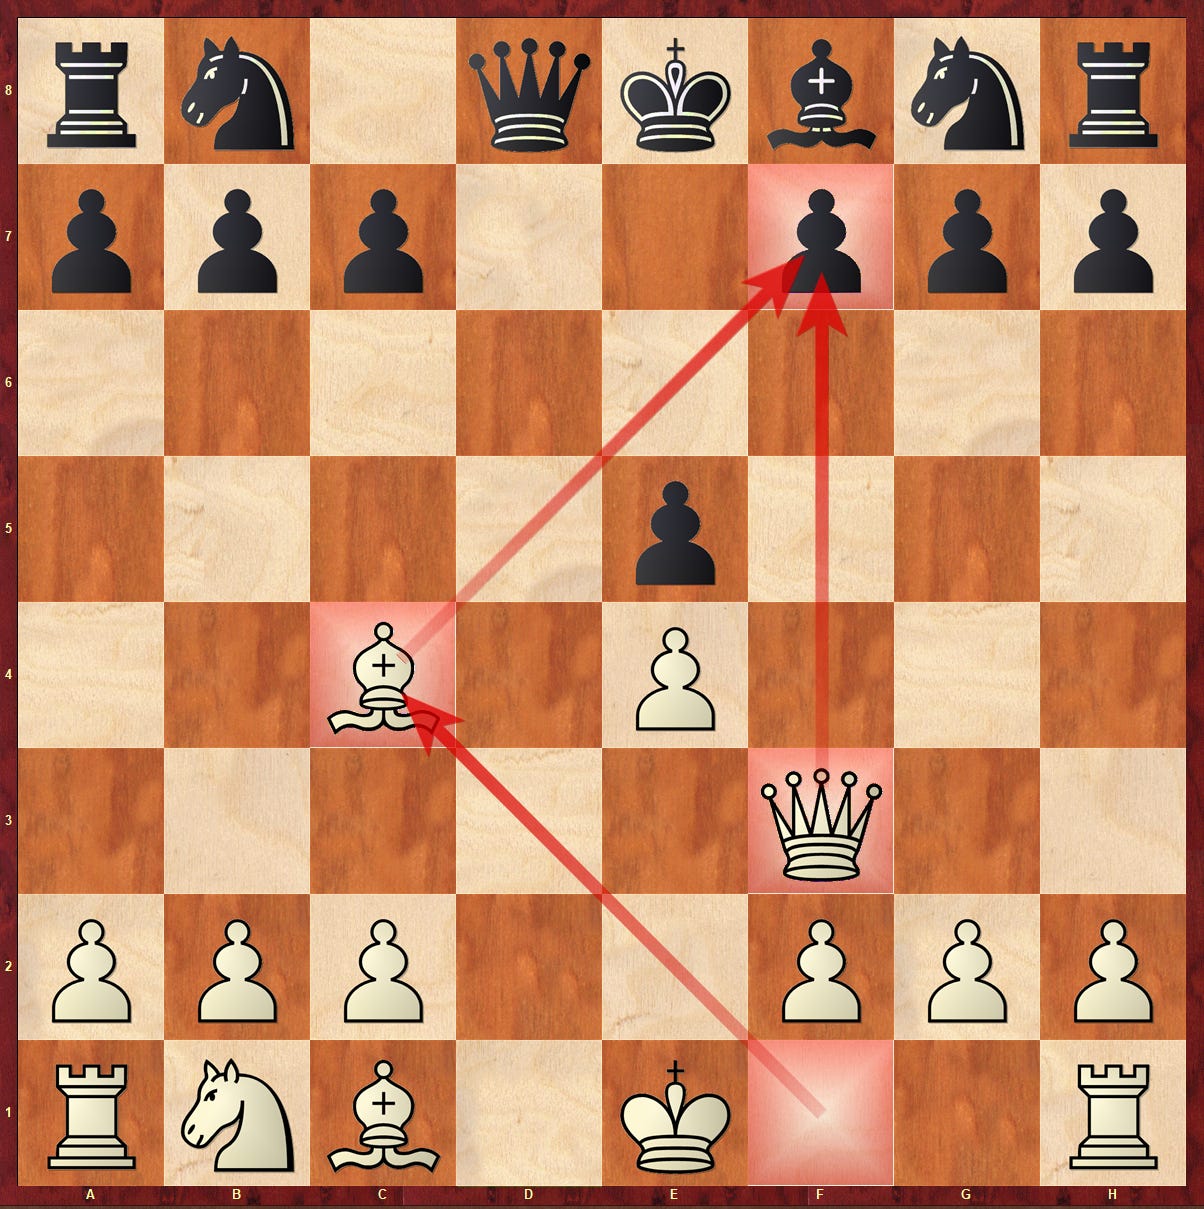
Developing a piece with a threat. This is a hallmark of Morphy’s games, and a good lesson for novice players. Develop pieces in concert, to attack the weak squares in your opponent’s camp. Mate is threatened on f7, and black would like to develop a piece:
… Nf6 7. Qb3! (diagram)
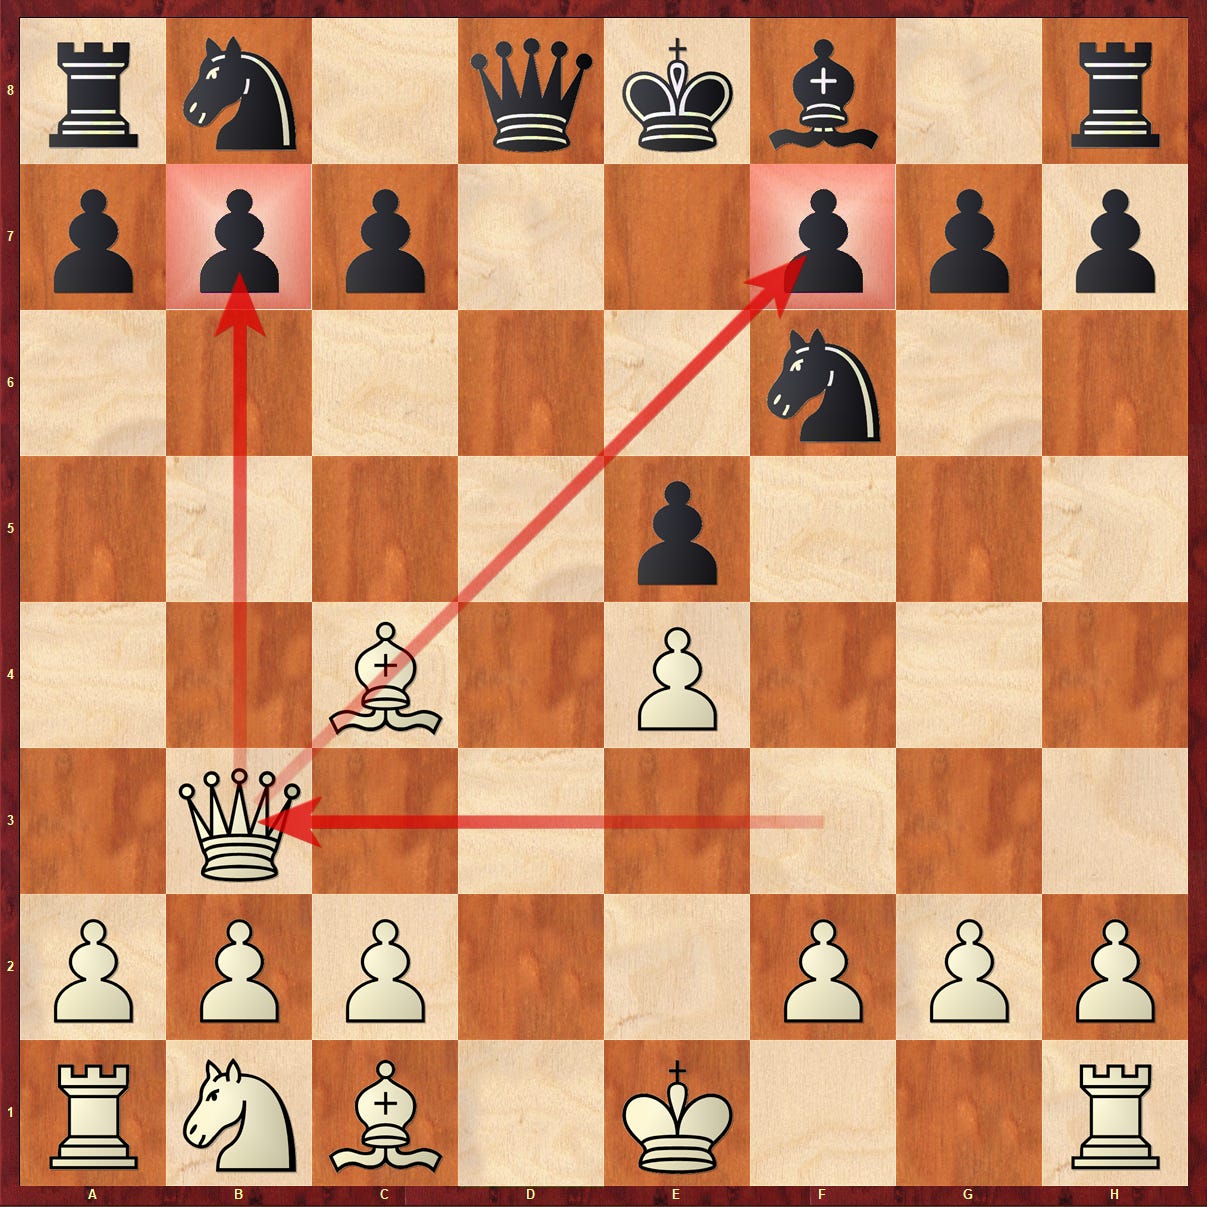
Already by move 7 black is “lost.” The maneuver Qf3-b3, in concert with Bc4, should be indelibly scored on your brain. In this case the weakness of the move 3. … Bg4 is on full display. Black is hopelessly weak on the light squares, without a light squared bishop to oppose the monster on c4. The b7 pawn is left in the lurch by the Bishop’s sortie, and with two weaknesses, Morphy finds a “double attack.” The black players cannot defend both pawns at once, but obviously the e7 pawn is more important.
Incidentally, Nxe4 isn’t threatened at all, not even a little bit. 7. … Nxe4 8. Bxf7+ Ke7 (or d7) 9. Qe6# cannot be allowed.
… Qe7 8. Nc3 (technically, Qxb7 is winning a clear pawn, and is therefore, “correct.” But Morphy prefers to play for mate. In this position he has three pieces developed to black’s one. We aren’t counting the e7 queen as “developed,” because it’s doing nothing but defending on the e7 square and it must move again in order to free the f8 bishop. A 3 to 1 lead in development is quite a lot - and the b7 pawn still must be defended…
… c6 (now the Queen defends b7) 9. Bg5 b5? (diagram)
As Garry Kasparov writes in “My Great Predecessors,” 9. … b5? is an “attempt to solve all the problems in one go.” Black wants to push the bishop off the a2-f7 diagonal, after which he will be free to complete his development. But this is the decisive mistake. White has all of his minor pieces and his queen developed, he’s free to castle to both sides and connect the rooks, while black has developed only a single knight, and his king is stuck in the center. The logic of chess suggests that white’s initiative should be decisive here. And it is. White to play and win.
Nxb5! cxb5 11. Bxb5+ Nbd7 12. 0-0-0! (diagram)
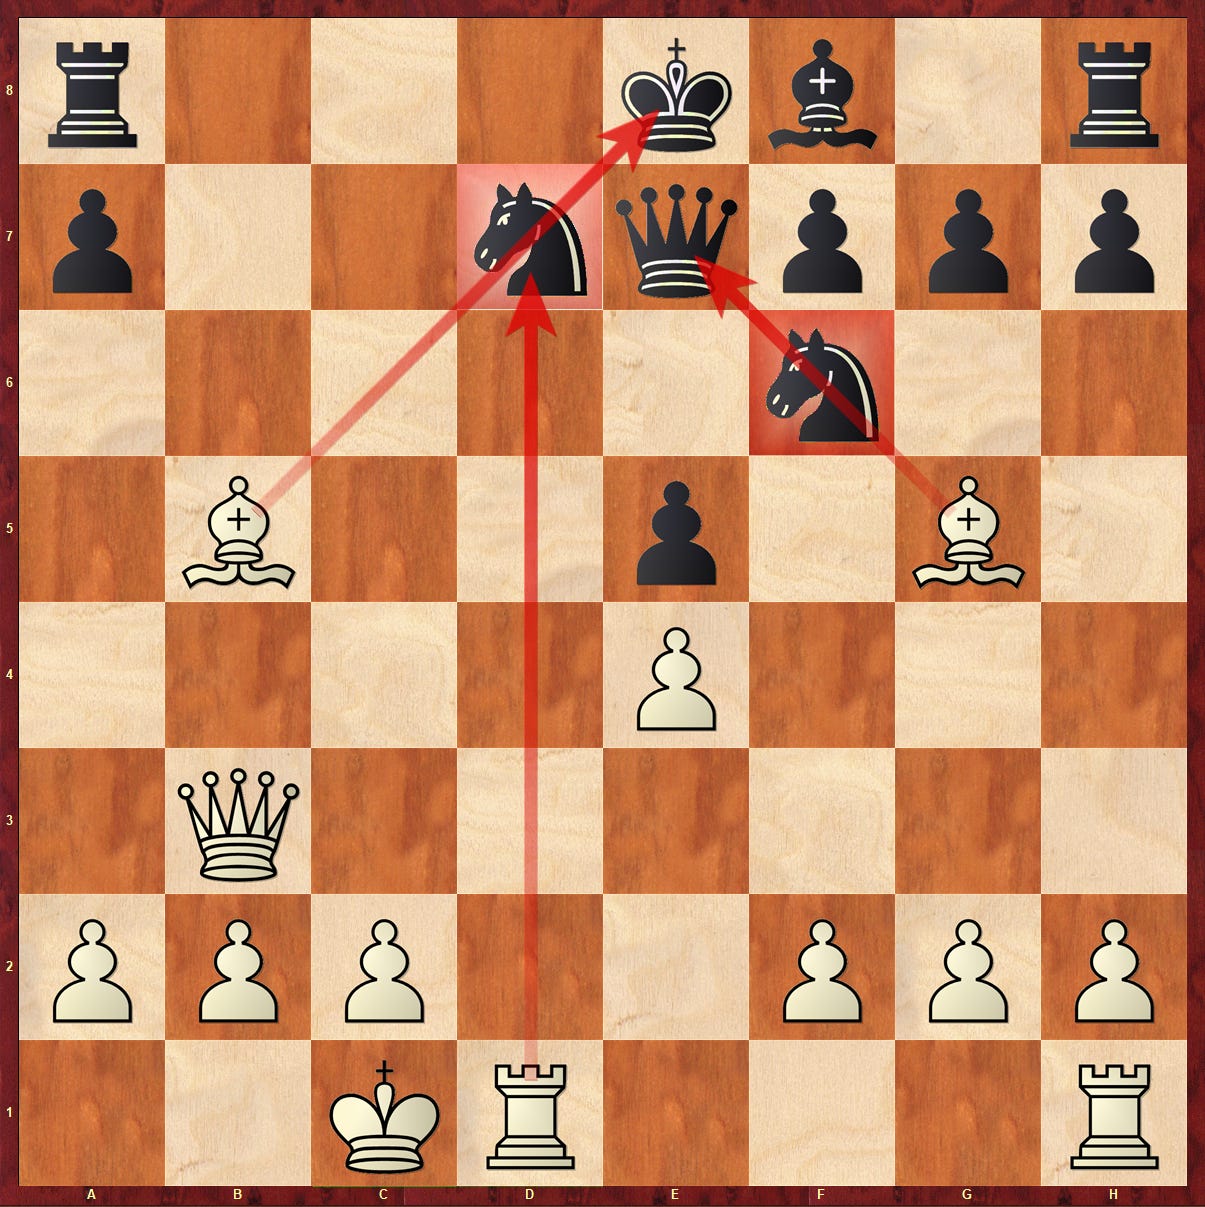
Another move that should be indelibly burned into your chess memory. Queenside castles, bringing the a1 rook immediately into play on the open d-file, where it adds pressure to the pinned d7 knight. The f6 knight is also pinned, incidentally, and the d7 knight is curiously short of defenders - the king cannot move into check, and black would rather not lose his queen.
… Rd8 (diagram)
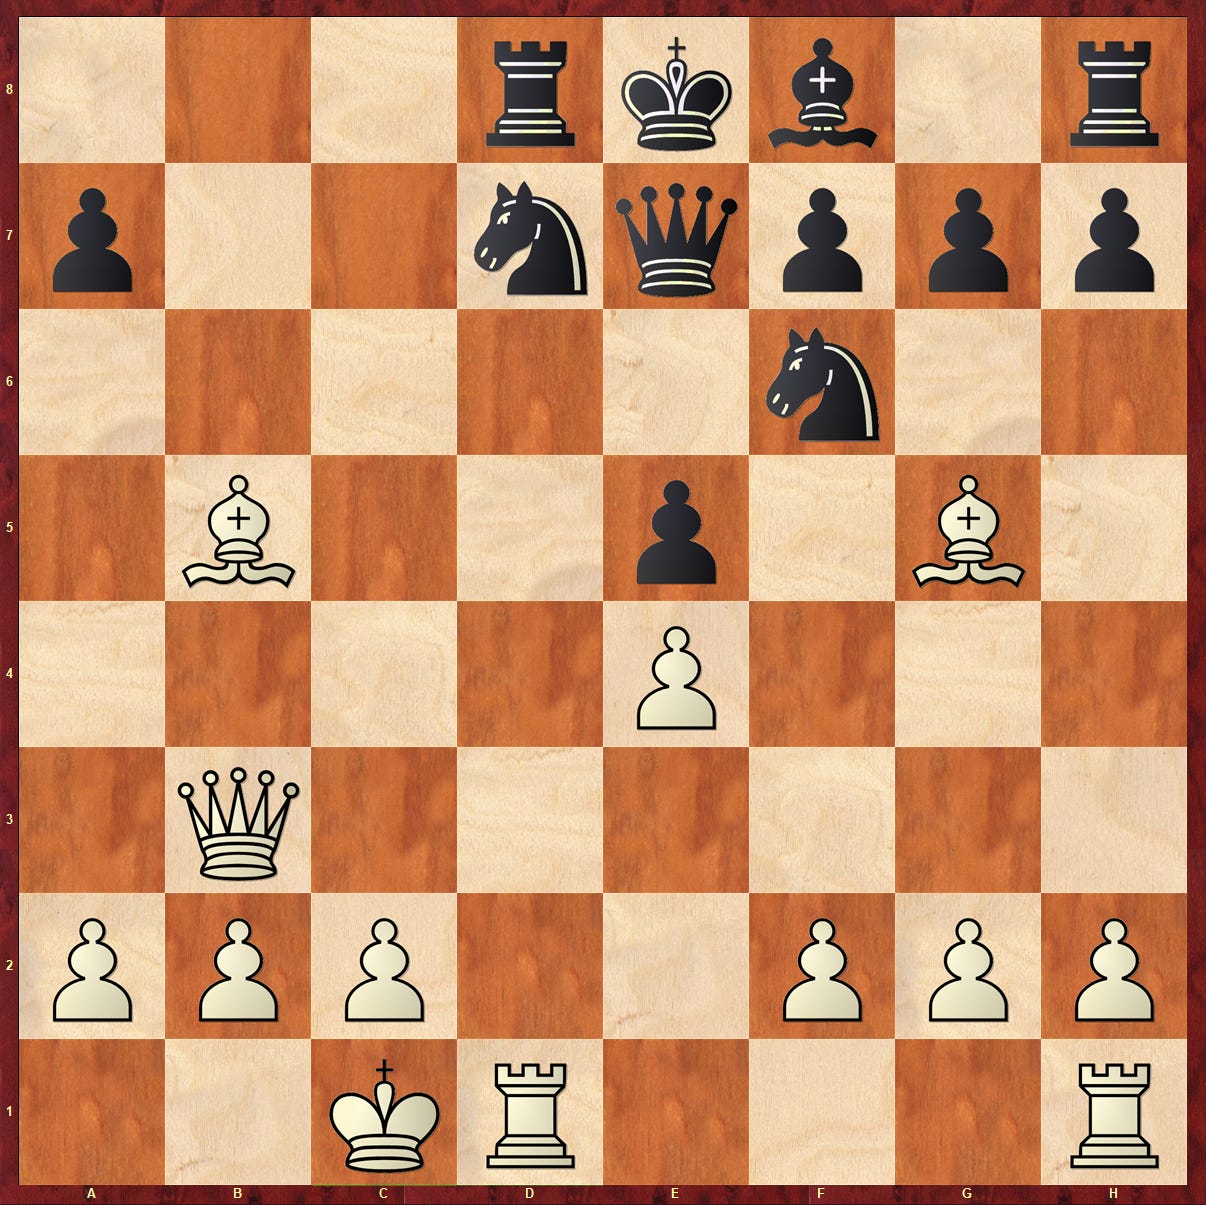
It should be clear that black is strategically “busted.” All of his pieces are stuck, and immobile. But you have to finish the job. How to proceed? White to play and win.
Rxd7!
A vitally important concept. The pin is more valuable than the material. In this case, the rook sacrifices itself for the knight, but the b5 bishop maintains the pin, and when the h1 rook joins the attack, there are no black pieces left to come to the aid of the poor, pinned rook on d7:
… Rxd7 14. Rd1! Qe6 (stepping out of the pin) 15. Bxd7 Nxd7 (diagram)
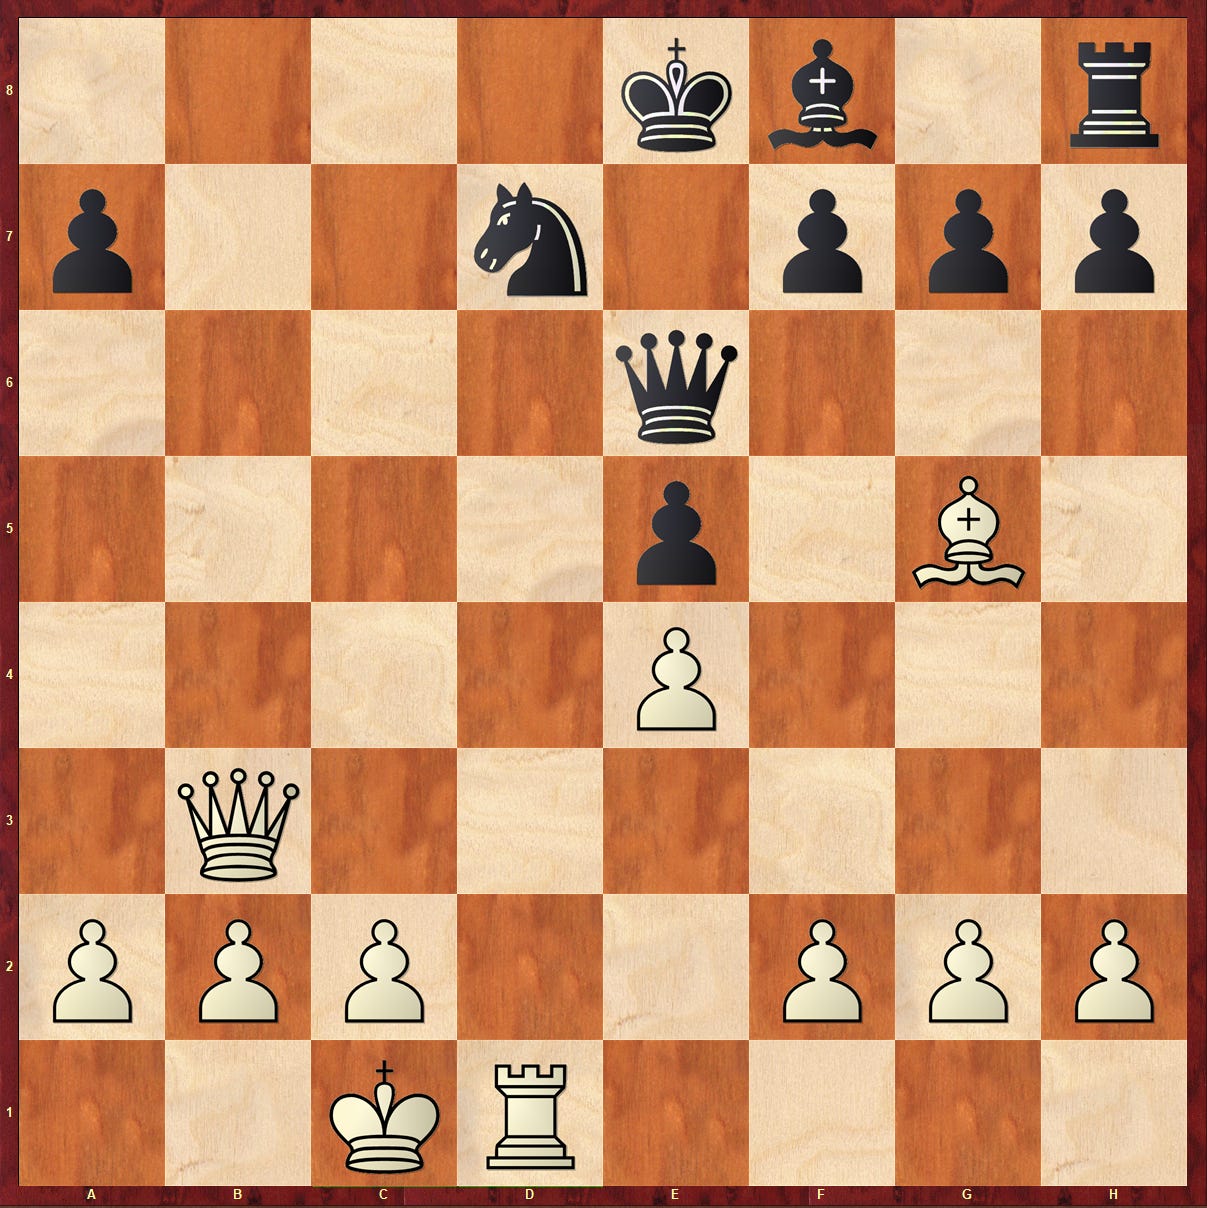
The finish is tremendously beautiful:
Qb8+! Nxb8 17. Rd8# (diagram)

The game leaves an impression. The coordinated development of the pieces and the economy of action that make up Morphy’s combinatorial play, as well as the minimal material required at the end in order to trap the black king in a mating net are all noteworthy. Every single one of Morphy’s moves lands with purpose.
The question for the aspiring chess student is: What to take away from this, and what to do with that knowledge? Clearly Morphy’s opponents were not as strong as even class A/B players today. But these themes, tactics, and patterns crop up again and again, even in Grandmaster play. Prioritize development and initiative. Develop your pieces with a gain of tempo. Open the position. Coordinate to attack the weak points in your opponent’s camp and the pinned pieces defending them.
Let’s look at a more modern grandmaster game and see if we find echoes of Morphy’s play:
Hikaru Nakamura vs. Loek van Wely, Amsterdam, 2010
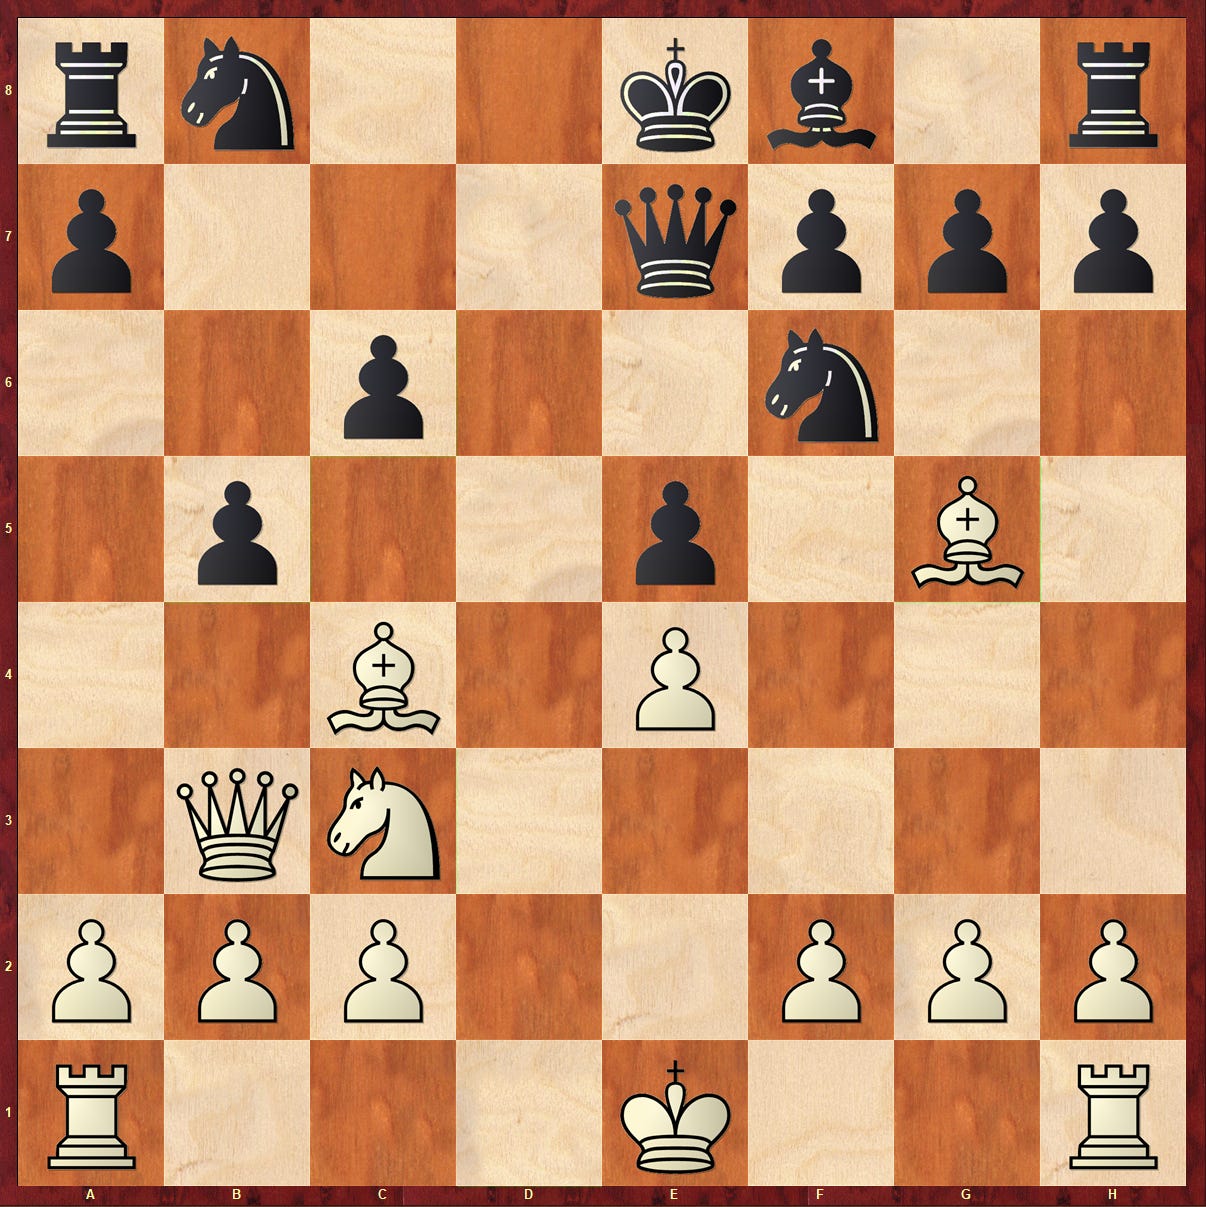
e4 c5 2. Nf3 d6 3. d4 cxd4 4. Nxd4 Nf6 5. Nc3 a6 6. Bg5 Nbd7 7. f4 Qb6 8. Qd2!? (diagram)

In the Najdorf defense, the idea of sacrificing the b2 pawn in order to distract the black queen and further white’s development is well known. The so-called “poisoned pawn variation” occurs in a nearly identical position, but with the d7 knight back on its home square and the black e-pawn on e6. The opening has been debated ad nauseum for over fifty years, though I believe the modern computers believe it’s simply too dangerous for black to take this pawn. With the inclusion of Nbd7, I suspect this gambit is only more dangerous for the black player. This specific variation is rare at the top level, and white scores well when black takes the bait, as van Wely did here. At least, nobody can say he wasn’t spoiling for a fight:
… Qxb2!? 9. Rb1 Qa3 10. Bxf6 Nxf6 11. e5 dxe5 12. fxe5 Nd7? (diagram)
But this is a losing move. 150 years had passed between the Morphy game and this one. Hikaru Nakamura and Loek van Wely are both capable, professional grandmasters. But let’s look to the similarities. White has four pieces developed: a Rook (b1), two knights, a queen. Black has one piece developed. The Queen on a3, which finds itself rather exposed. Nakamura begins to probe the weak points in the black position, looking for a fork, or double attack:
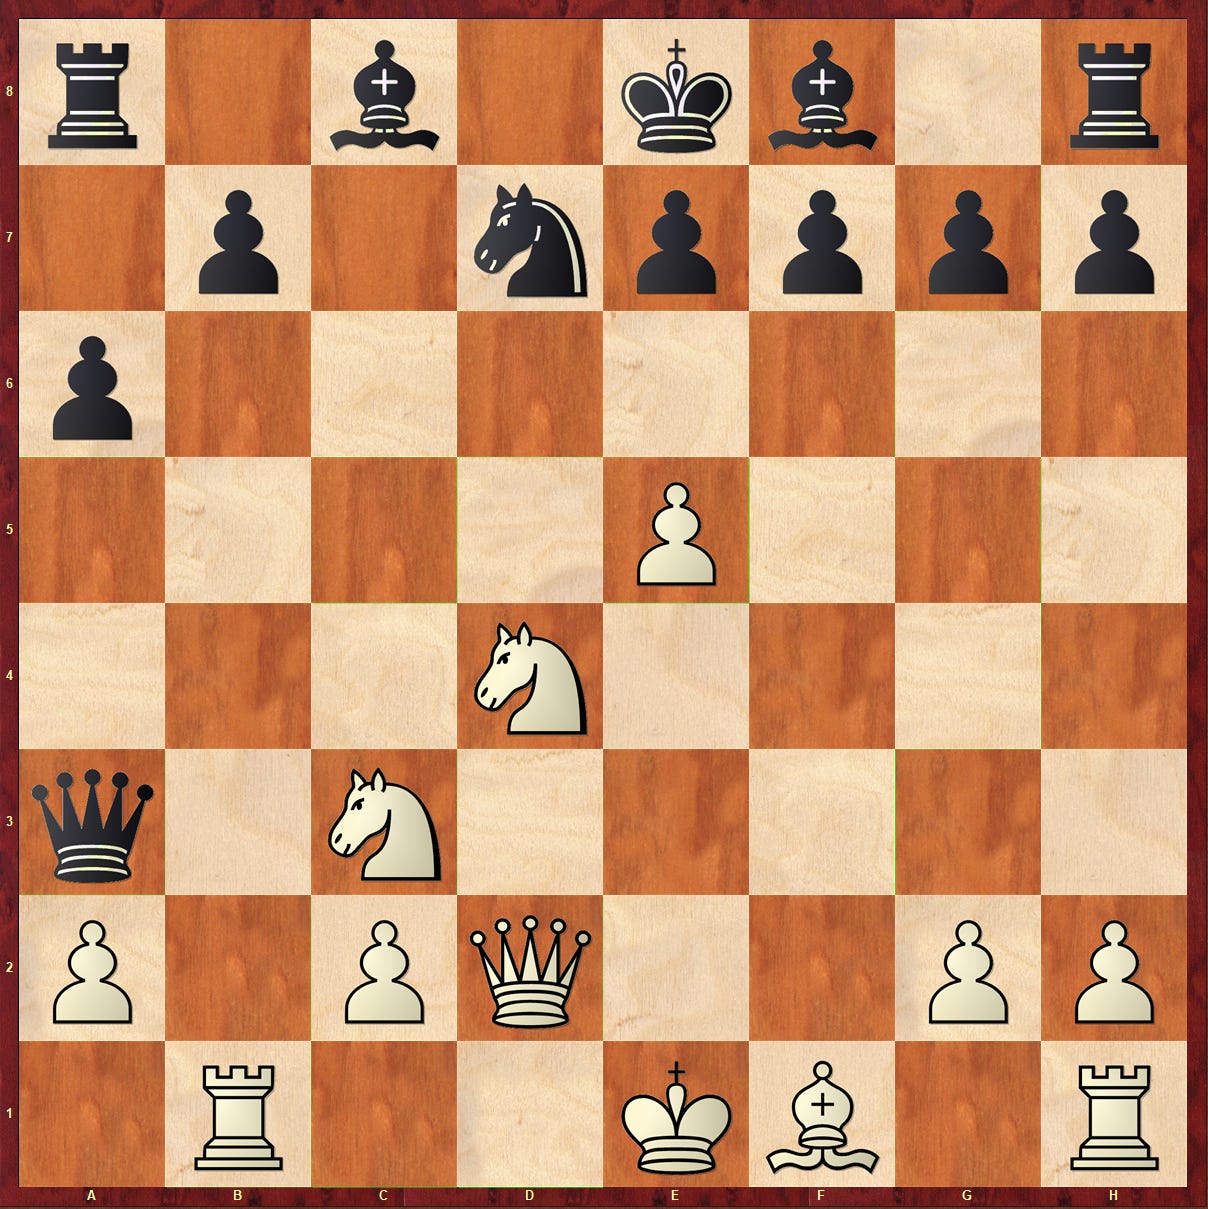
Nd5! (threatening a fork on c7) Qc5 14. Nb3 (hitting the queen) Qc6 15. Na5 (hitting the queen and the weak b7 pawn) Qc5 16. Nxb7 Qc6 (the computer will tell you 16. … Bxb7 17. Rxb7 is “better,” but both are clearly losing. Perhaps van Wely just wanted to get home) 17. Rb6! (diagram)

Black resigned, in view of 17. … Nxb6 18. Nf6+ exf6 19. Qd8# or 17. … Qxb6 18. Nxb6, or 17. … Qa4 18. Nc7#
Of course, white can also win with other moves. 17. Qa5! does the job. And most bizarrely, 17. Nd8! which is rather spectacularly bizarre looking.
On move 12, black is still surviving after 12. … Ng4! because after the same sequence of knight moves as the game, the black queen can respond to 15. Na5 by retreating to the d7 square. Intuitively, we can take from this example (and the opera house game) that it’s generally worse to “undevelop a piece,” given the option. It’s better for the knight to jump to g4, intuitively, than d7, where it stands in the way of black’s own pieces.
Here, Nakamura parlayed a development lead (four pieces to one) into a mating attack, and if van Wely had been in a mood to let Nakamura actually deliver the mate, the King gets mated on e8, via the open d-file, with the f8 bishop on its home square. The e8 square is a very dangerous place for the black king to be once the d-file has been opened. If you’re ahead in development and the black king is stuck in the center, open it! If these types of things can happen to top grandmasters, they can happen in your games, I promise.
If you prefer video analysis to the written word, check out John Bartholomew’s video on the Opera House game:
Or try and find John’s Opera House Game study on chessable.
Puzzle of the Week #12:
But first, a solution to last week’s puzzle:
… Kg7! 2. Rh5 Kg6! and the rook has nowhere to go where it won’t be immediately captured, or forked by a knight check. For example: 3. Ra5 Nb3+, followed by Nxa5. Trapped on a wide open board. Well played, Beth Harmon.

In this week’s puzzle, it’s white to play and win. The position is taken from Bronstein vs. Korchnoi, Leningrad, 1962.
If you’d like, email solutions to JensenUVA@gmail.com, or DM me on twitter @JensenUVA.
And as always, like, share, forward, subscribe, tweet about it, be about it. And until next time, ARGH! SHAKHMATY!!!